
Looking for an easy Easter craft? Here is a simple DIY Easter wreath with a moss bunny plus a very easy to make Easter basket centerpiece.
Coming up for air here for a minute!
What a week!
Thank you SO much for all of your kind comments, messages and overwhelming display of care and concern for our sweet Maci, after publishing this post, written with my misty eyes.
So far, Maci has been taking the hurdles that come with a broken arm in great stride this week.
Even stepping up to be the middle school girl’s soccer team manager, after learning she had made the competitive squad, alongside her big sister, Eve, but of course she is unable to fill her position as a player. This team manager role will hopefully take the sting out of not being able to be a field player this season.
In other news, we had a birthday to celebrate too!

Eve turned 14 years old, you can catch a video and my Momma birthday message to her, here on facebook or Instagram.
Stay tuned to find out the surprise I planned for her and how we celebrated Eve’s birthday in next week’s blog post!
It’s a super fun idea and I think you might want to steal the idea too for a teen girl birthday celebration!
But for now, let’s discuss this easy Easter wreath!
Maci and I decided to get crafty one night this week.
You may remember last year around this time, we decided to decoupage Easter eggs using cocktail napkins.

You can get the easy DIY on how we made these Easter egg decorations HERE in this post.
And this year, we decided to make our own Easter wreath.

While Eve and Livvy sped off to lacrosse practice with Shawn, Maci needed some down time and so she and I made an Easter wreath and a supper simple Easter wall basket!
Yes, even with one arm Maci was able to help me create this pretty Easter wreath and also made her own Easter hanging basket too for super simple DIY Easter decor!

Are you ready to find out how to make this easy Easter wreath and see the cute Easter basket decor Maci created with one hand. 🙂
Follow me friend!
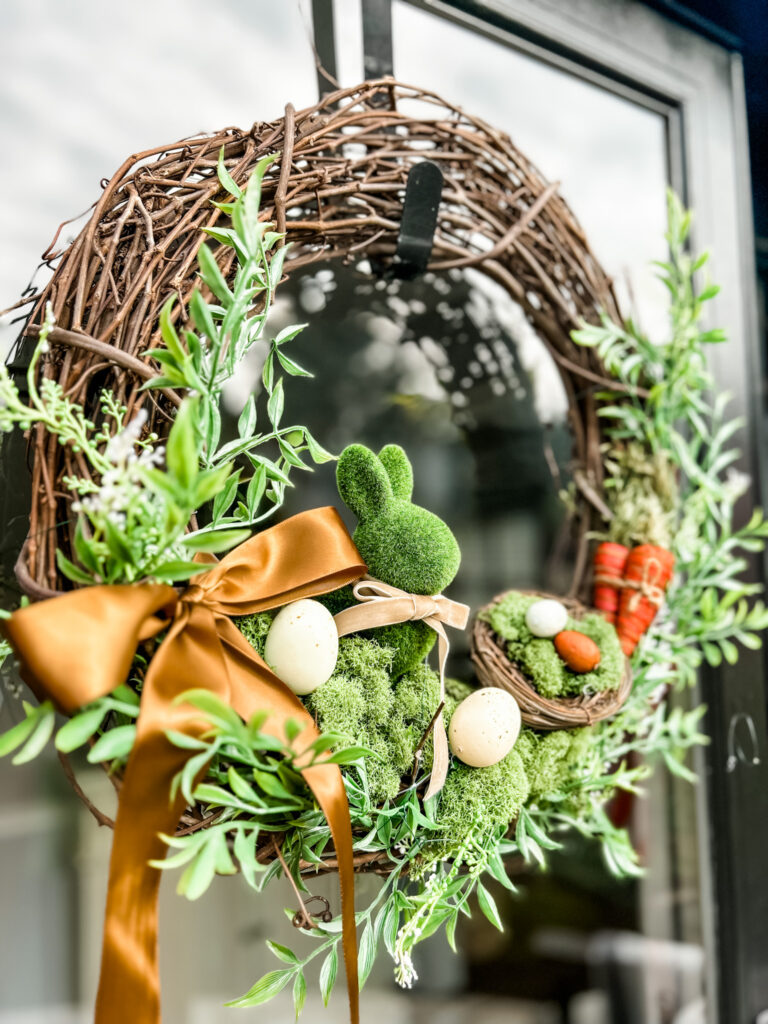
How To Make An Easy Easter Wreath
You may remember last year around this time we made the sweetest and super easy baby pampas grass Spring wreaths, HERE in this post.
This year, I decided to make this Easter wreath after being inspired by my blogger friend, Rachel over at The Pond’s Farmhouse.
You can see Rachel’s Easter wreath here, she used an egg shaped grapevine wreath and mine is a regular circular grapevine wreath.
First we gathered our supplies to start making our Easter wreath and Easter basket decor.
For the record?
Maci thinks you should judge us and tell us which one you like better…no sympathy votes for her either! 🙂 HA!
Gather supplies.

I purchased most of the supplies you see here, at our local Michael’s store, including the basket that Maci decorated.
However, I have all the supplies you need to make this Easter wreath linked from Amazon, at the bottom of this post.
You can also click HERE to see all of the supplies on my Amazon Storefront.

Attach a strand of Spring greenery to the grapevine wreath.

I used a strand of greenery that I already had on hand and I cut it in half.
I stuck one end in the bottom center of the grapevine wreath and laid the garland on the right side of the wreath.

Then, I attached the strand of Spring greenery using a piece of floral wire and tied the wire around the wreath and greenery to hold the top end of the greenery in place on the wreath.

Next, I used the other half of the Spring greenery strand that I had cut and repeated the same steps.
Sticking one end of the greenery into the bottom of the wreath and stretching it out to cover the left side of the wreath.
Attach the moss bunny on the wreath.
This is the trickiest part of making the wreath.
Maci actually had the idea to stick an appetizer food skewer into the bottom of the moss bunny.


This worked wonderfully, as I was then able to leverage the skewer and stick it into the grapevine wreath.
If you look closely below, you will see the natural colored skewer stuck into the grapevine.

From this point, on I worked on making the Easter wreath while it was hanging up on the inside of our kitchen patio door.
This was easier for me to keep the wreath still and work on it, as I added the Easter decor to the wreath.

I also added one piece of floral wire and wrapped it around the neck of the moss bunny and secured it to the wreath to keep the bunny stable.

Add the jute carrots to the other side of the Easter wreath.

I already had this trio of carrots on hand, so I set the carrots onto the right side of the wreath and attached them by wrapping another piece of floral wire around the carrots and the back of the wreath and twisting the wire tight in the back.


Love my little helper. 🙂

Next, add the bird’s nest, using the floral wire.
I added the small bird’s nest just below the carrots for added interest, but you can also leave this out!

Tie a velvet ribbon around the neck of the moss bunny.
I had this velvet ribbon left over from Christmastime, when I tied ribbons onto our Christmas tree.
Here is thin velvet ribbon from Amazon.

Next, hot glue the artificial moss to fill in the gaps.
For this part, I moved the wreath back on to the kitchen counter to work on it laying flat.
Maci helped to hot glue the artificial moss into places where there were gaps between the bunny, bird’s nest and carrots.

Simply, add a few dots of hot glue onto the wreath and then press the moss down onto the glue.


Hot glue a few small Easter eggs to the moss and on the bird’s nest.

Lastly, add a satin bow to the side of the wreath!

Ta da you are done!

This wreath can be used indoors or even outdoors, weather permitting.


Above, I have the Easter wreath hanging by a suction cup hook on a window pane, inside the kitchen.
Below, I have it hanging on our front door!

(Click HERE to Shop the Front Porch.)
Are you ready to see Maci’s EASY Easter Basket decor?
If making the grapevine Easter wreath feels a little tricky to you…then perhaps try this Easter decor idea.
We bought this wicker wall basket at Michael’s just this past week.
First, stuff the bottom of the basket with plastic.

Next, add artificial moss on top of the plastic.

Add in your Easter decor!

That’s it!
You were thinking it was going to be harder than that, weren’t you!? 🙂

We did add a Spring sprig of artificial flowers to the left backside of the basket and stuffed it down, to help add a little height and interest.

There you have it friend!
Two easy Easter decor ideas to have fun experimenting with this weekend as we prepare our hearts to celebrate the true meaning of Easter coming next week!
Now…per Maci’s request…it’s time to cast your votes! 🙂
Which one are you loving the most?
No pressure! 🙂


Hope you enjoyed this post filled with Easter DIY decor ideas and inspiration!
Thanks for being here friend…wishing you a warm weekend filled with love and laughter.
Living on a prayer,
Heather
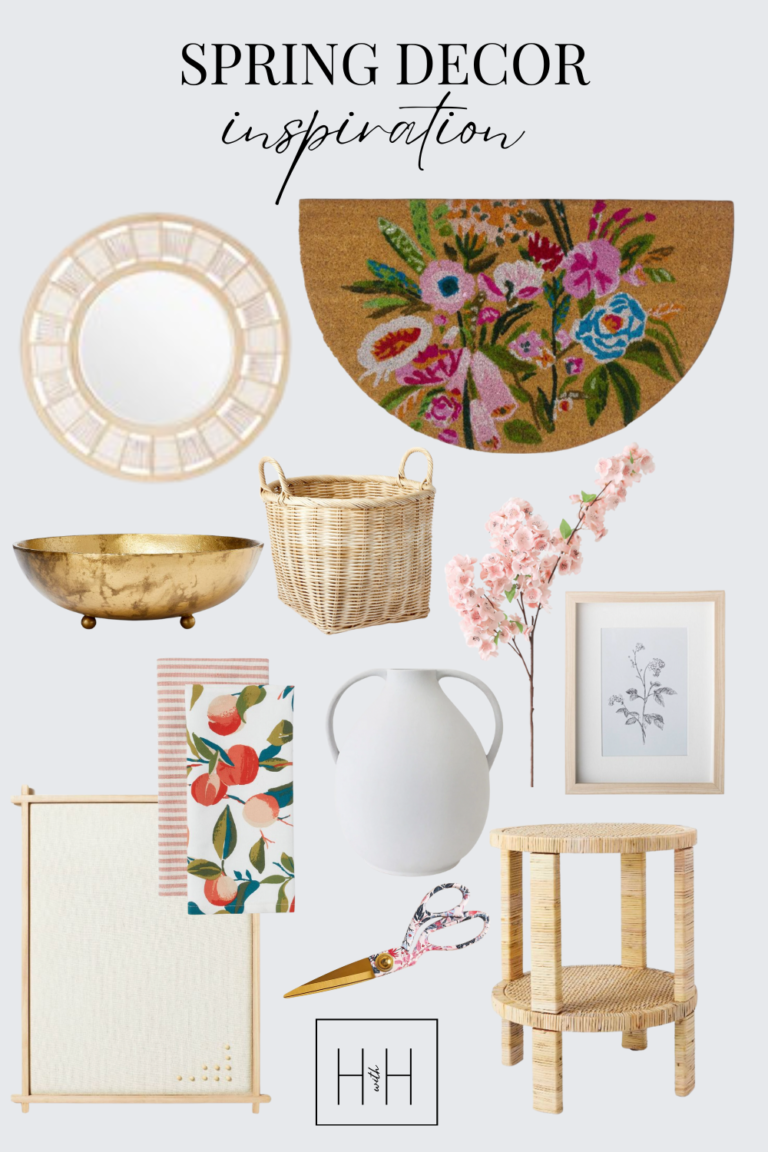
Shop this post:

Affiliate links used in this post at no additional cost to you.
You may also enjoy these blog posts:


One Comment